Conversion Tools
![]() Toolbar : Conversion Tools
Toolbar : Conversion Tools ![]()
Menu : CADPower-> Conversion-> Lines/Polyline/Arc/Splines-> Convert arced polylines to linear segment polylines CmdLine : CP_PLARC2PL
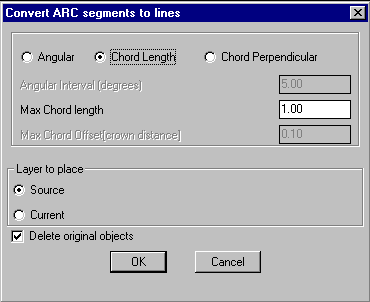
Converts arc segments in polylines or ARC objects to polylines with linear interpolated segments. The arc section is approximated by connecting with a number of straight line segments. The linear segment of the original polyline is left as it is. The arc approximation (interpolation) can be done by any one of the three methods:
Angular
In this case, sampling is done at the specified angular interval (in degrees) along the arc segment. This is useful when you want to replace an arc or circle with linear segments at every fixed angular interval like 5 or 10 degrees. This method is usually not preferred to deal with polyline arc segments in surveyed horizontal curves where it is desirable to adopt either of the other two parameters described below.
Chord Length
This is the maximum allowable chord length during the interpolation of the arcs.
Chord Perpendicular (crown distance)
This is the maximum crown distance of the chord that is allowable during the arc interpolation. The crown distance is the distance from the midpoint of the chord to the arc.
Layer to place:
Source: Choosing this option places the converted polylines in source object layer.
Current: Choosing this option places the converted polylines in current layer.
Delete original objects: Checking this box deletes the original objects.
 Toolbar : Conversion Tools
 ![]()
Menu :CADPower-> Conversion-> Lines/Polyline/Arc/Splines-> Convert linear polyline to arc (arced) polylines CmdLine : CP_PLINE2ARC
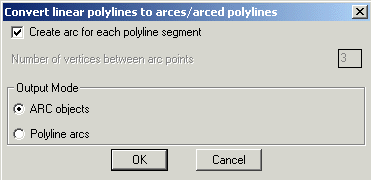
The CP_PLINE2ARC command converts linear segment polylines into arc objects or polyline with arcs. If you have polylines defined with a number of points connected by linear segments and would like to approximate it with an arc segment that connects every n th vertex, then CP_PLINE2ARC is the command to use. An arc is defined by three points.
Create arc for each polyline segment: Checking this box creates arc between each segment of polyline which will be useful to prepare data for many CNC applications where you need to provide the input as arc instead of polyline geometry.
Number of vertices between arc points: Specify the number of vertices to skip between arc points.
Output Mode: Specifies the type of output object to be created. This can be either an ARC object or polyline with arc segments.
ARC objects: Choosing this type causes the output to be ARC objects.
Polyline arcs: Choosing this type creates polyline object with arced segments.
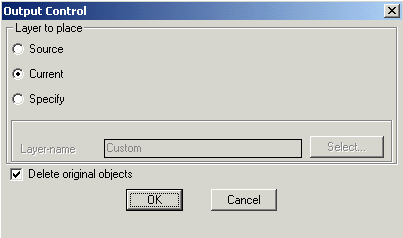
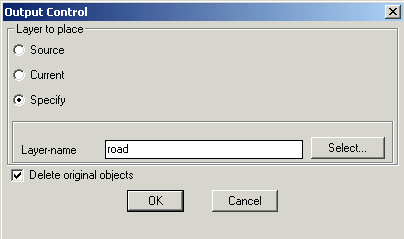
Layer to place
Source: Choosing this option places the result in the layer in which it was created (source layer)
Current: Choosing this option places the result in the current layer
Specify: Choosing this option allows to specify the layer in which the resultant object to be placed
Layer-name: Displays the name of the layer selected
Select: Clicking on Select button pops up the select layer dialog box
Delete original objects: Checking this box deletes the original source object (polyline) after converting into arc
Toolbar : Conversion Tools 
Menu : CADPower -> Conversion -> Lines/Polyline/Arc/Splines-> Convert lines and arcs to polylines CmdLine : CP_LINE2PL
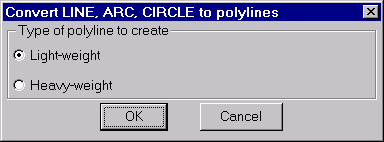
The CP_LINE2PL command is used to convert LINE, ARC and CIRCLE objects into polyline objects. The dialog box allows options to create either a light weight or heavy weight polyline out of the source objects.
Toolbar : Conversion Tools 
Menu : CADPower -> Conversion -> Lines/Polyline/Arc/Splines -> Convert splines to polylines CmdLine : CP_SPL2PL
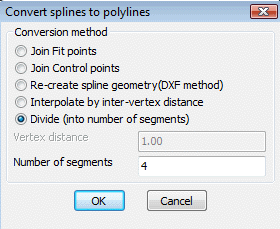
It is possible to use the CP_SPL2PL command to convert splines to polylines in three different ways.
Join Fit points: This option joins all the Fit points (DXF Code 11) of a spline and creates a polyline out of it.
Join Control points: This option joins all the Control (DXF Code 10) points of a spline and creates a polyline out of it.
Re-create spline geometry (DXF method): This method is the most precise and attempts to re-create the geometry of the spline as closely as possible. It works by creating the DXF output of the spline object in Release 12 format and then imports it in again as a polyline. With long polylines, this may occasionally cause AutoCAD/BricsCAD to become unstable and even crash. Please ensure that you save your drawing prior to running this command.
Interpolate by inter-vertex distance: This method allows specifying a distance between the two vertices of the polyline that will be created.
Vertex distance: Specify the vertex distance here. Every polyline vertex will be spaced apart by this amount.
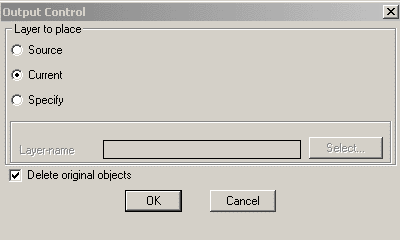
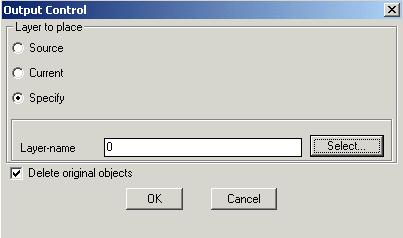
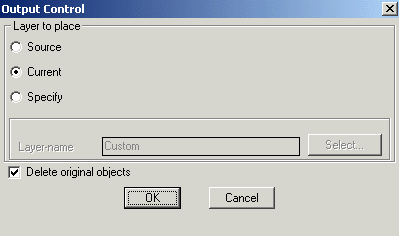
Layer to place
Source: Choosing this option places the result in the layer in which it was created (source layer)
Current: Choosing this option places the result in the current layer
Specify: Choosing this option allows to specify the layer to place the resultant object
Layer-name: Displays the name of the layer selected
Select: Clicking on Select button pops up the select layer dialog box
Delete original objects: Checking this box deletes the original source object (Spline) after converting to polyline
Watch: ![]()
Toolbar : Conversion Tools 
Menu : CADPower-> Conversion-> Lines/Polyline/Arc/Splines-> Convert polylines to splines CmdLine : CP_PL2SPL
Converts polylines to splines. The defining vertices of the polylines are used as the Spline Fit points.
Layer to place
Source: Choosing this option places the result in the layer in which it was created (source layer)
Current: Choosing this option places the result in the current layer
Specify: Choosing this option allows to specify the layer to place the resultant object
Layer-name: Displays the name of the layer selected
Select: Clicking on Select button pops up the select layer dialog box
Delete original objects: Checking this box deletes the original source object (Polyline) after converting to spline
Toolbar : Conversion Tools 
Menu : CADPower -> Conversion Tools -> Line/Polyline/Arc/Spline -> Line 2 XLINE CmdLine : CP_LINE2XLINE
The CP_LINE2XLINE is a quick tool to define an XLINE along an existing line entity.
Toolbar : Conversion Tools 
Menu : CADPower -> Conversion Tools -> Polyline/3D Face/Mesh -> Convert polylines to 3DFaces CmdLine : CP_PL23DFACE
The CP_PL23DFACE command creates 3dface objects out of any 3 or 4-sided 2d/3d polyline objects.
Watch: ![]()
Toolbar : Conversion Tools ![]()
Menu : CADPower -> Conversion Tools -> Polyline/3D Face/Mesh -> Convert polylines to Polyface mesh CmdLine : CP_PL2PFACE
The CP_PL2PFACE command converts polylines (2d & 3d) into polyface mesh objects. The polyface mesh thus created has only one face which is defined by the plane formed by joining the vertices of the polyline in order.
Toolbar : Conversion Tools ![]()
Menu : CADPower -> Conversion Tools -> Polyline/3D Face/Mesh -> Convert 3DFaces to polylines CmdLine : CP_3DF2PL
The CP_3DF2PL command creates a 3d polyline from the vertices of selected 3dface objects
Layer to place
Source: Choosing this option places the result in the layer in which it was created (source layer)
Current: Choosing this option places the result in the current layer
Specify: Choosing this option allows to specify the layer in which the resultant object should be placed
Layer-name: Displays the name of the layer selected
Select: Clicking on Select button pops up the select layer dialog box
Delete original objects: Checking this box deletes the original source object (3DFace) after converting to polyline.
Toolbar : Conversion Tools 
Menu : CADPower -> Conversion Tools -> Polyline/3D Face/Mesh -> Convert 3DFaces to polyface mesh CmdLine : CP_3DF2PFACE
TThe CP_3DF2PFACE command creates a 3d polyface mesh object from 3dface objects.

Layer to place
Source: Choosing this option places the result in the layer in which it was created (source layer)
Current: Choosing this option places the result in the current layer
Specify: Choosing this option allows to specify the layer in which the resultant object should be placed
Layer-name: Displays the name of the layer selected
Select: Clicking on Select button pops up the select layer dialog box
Delete original objects: Checking this box deletes the original source object (3DFace) after converting into polyface mesh object
Toolbar : Conversion Tools 
Menu : CADPower-> Conversion-> Polyline/3DFace/Mesh-> Polyface mesh to Polylines CmdLine : CP_PFACE2PL
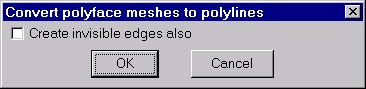
The CP_PFACE2PL command is used to convert a polyface object into polylines.
Create invisible edges also - This option includes invisible polyface edges in the resulting polylines.

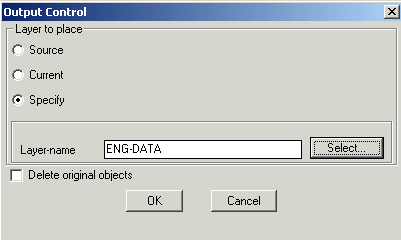
Layer to place
Source: Choosing this option places the result in the layer in which it was created (source layer)
Current: Choosing this option places the result in the current layer
Specify: Choosing this option allows to specify the layer in which the resultant object should be placed
Layer-name: Displays the name of the layer selected
Select: Clicking on Select button pops up the select layer dialog box
Delete original objects: Checking this box deletes the original source object (Polyface) after converting to polyline
Toolbar : Conversion Tools 
Menu : CADPower-> Conversion-> More Conversion-> Convert Blocks/Shapes/Text/Circle to points CmdLine : CP_BLKSHP2P
Creates a point at the insertion point of every shape, block or text object in the selection set. Optionally, the source objects can be deleted.
Tech Info: If there is any extended entity data or object table data in the source objects, they will be transferred to the points.
Layer to place
Source: Choosing this option creates points in the source layer
Current: Choosing this option places the points in the current layer
Specify: Choosing this options allows to specify the layer in which the points will be created
Layer-name: Displays the name of the layer selected
Select: Clicking on Select button pops up the select layer dialog box
Delete original objects: Checking this box deletes the original source object (block/shape) after creating the points.
Toolbar : Conversion Tools 
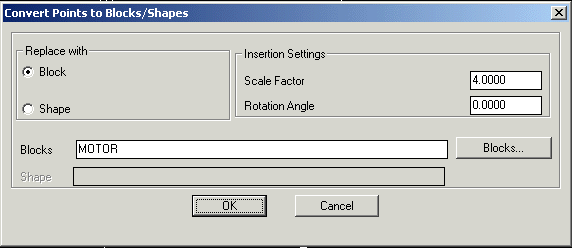
Menu : CADPower -> Conversion -> More Conversion -> Convert Points/Text/Circle to block/shapes CmdLine : CP_P2BLKSHP
Replaces all selected point objects with Blocks or Shapes.
Tech Info: If there is any extended entity data or object table data in the source objects, they will be transferred to the new target objects.
Replace with:
Block: Choosing this option allows to replace selected points with block.
Shape: Choosing this option allows to replace selected points with shape.
Insertion Settings:
Scale Factor: Allows to enter the required scale factor for the block/shape.
Rotation Angle: Allows to enter the required rotation angle for the block/shape.
Block Name: The "Blocks" button allows selecting the block for insertion.
Shape Name: Enter the shape name to insert
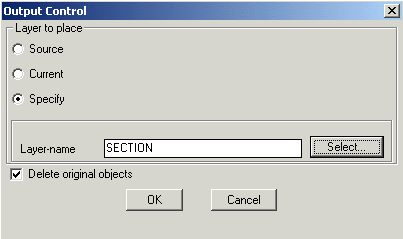
Layer to place
Source: Choosing this option creates block/shape in the source layer
Current: Choosing this option places the result in the current layer
Specify: Choosing this option allows to specify the layer in which block/shape is to be created
Layer-name: Displays the name of the layer selected
Select: Clicking on Select button pops up the select layer dialog box
Delete original objects: Checking this box deletes the original source object (point) after creating the block/shape
Toolbar : Conversion Tools 
Menu : CADPower -> Conversion -> More Conversion -> Convert Zero lengths to POINTs CmdLine : CP_0LEN2PNT
CP_0LEN2PNT converts all zero length objects into Points so that they can be easily identified and handled. The program accepts both lines, polylines and 3dfaces.
Often, because of a programming error or an improper import from other CAD systems or during processing of 3dface information for modeling purposes, zero length lines, polylines and 3dfaces get created. These objects are mostly redundant and do not contribute to the data in any way.
The standard object selection dialog box appears and allows the selection of polylines, lines and 3dfaces.
The elevation of the point object is the average of all the vertices.
Source: Choosing this option places the points in source object layer
Current: Choosing this option places the points in current layer.
Specify: Choosing this option allows to specify the layer for placing the points.
Label-name: Displays the selected layer name.
Select: Pops-up the Select Label Layer dialog box for choosing the required layer.
Delete original objects: Deletes the original zero length objects after converting them into points.
Tech Info: The points created will acquire new handles but any extended entity data in the source objects will be transferred to the points.
Toolbar : Conversion Tools 
Menu : CADPower -> Conversion Tools -> More Conversion -> Attribute to X-Data CmdLine : CP_ATT2XD
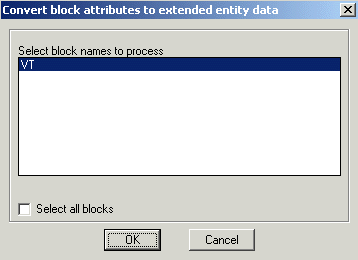
The CP_ATT2XD command converts block attributes to extended entity data directly in one single process.
Watch: ![]()
Toolbar : Conversion Tools ![]()
Menu : CADPower -> Conversion Tools -> More Conversion -> Ellipse to Circles CmdLine : CP_ELLIPSE2CL
Description Pending
Toolbar : Conversion Tools ![]()
Menu : CADPower -> Conversion Tools -> Polyline Types -> Heavy-Weight to Light-Weight CmdLine : CP_CH_H2L
Description Pending
Toolbar : Conversion Tools ![]()
Menu : CADPower -> Conversion Tools -> Polyline Types -> Light-Weight to Heavy-Weight CmdLine : CP_CH_L2H
Description Pending
Toolbar : Conversion Tools ![]()
Menu : CADPower -> Conversion Tools -> Scale Z values CmdLine : CP_SCALE_Z
Description Pending
Toolbar : Conversion Tools ![]()
Menu : CADPower -> Conversion Tools -> Change Properties ByLayer-to-ByEntity CmdLine : CP_BL2BE
Description Pending
Toolbar : Conversion Tools ![]()
Menu : CADPower -> Conversion Tools -> Flatten - Convert to 0.0 elevation CmdLine : CP_FLATTEN
Description Pending
Toolbar : Conversion Tools ![]()
Menu : CADPower -> Conversion Tools -> Units change CmdLine : CP_UNITCONV
Description Pending